
This past week we had met up with some folks from her softball team an played laser tag at lazerblaze in St. Matthews...
http://www.lazerblaze.com/

I haven't been since I was younger...
Good Times!
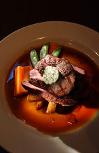
We also went out and ate at Dakshin which is very tasty!
www.mydakshin.com/

The menu is vast and stretches India through Indo-Chinese dishes...
Visual Basic game project
A knowledge creating forms, buttons, and text-boxes, as well as naming properties is helpful before proceeding...
The bulk of my post here to add reference of a project in a book I have been working out of:
Microsoft Visual Basic 2008 Express Programming for the Absolute Beginner
Here is a button click game code from that book that can help you practice your skills at creating a program in VB
Step 1: Creating a New Visual Basic Project
The first step in creating the Click Race game is to start Visual Basic and open a new Windows Forms Application project.
- If you have not already done so, start up Visual Basic 2008 Express and then click on File and select New Project. The New Project dialog will appear.
- Click on the Windows Form Application icon.
- Next, type Click Race as the name of your new application in the Name field located at the bottom of the New Project window.
- Click on OK to close the New Project dialog.
Visual Basic will now create a new project, including an initial form, in its IDE.
Step 2: Creating the User Interface
Now it is time to add the controls required to assemble the game’s interface. The overall layout of the game’s interface is shown in Figure 2.29.

- Let’s begin by adding a TextBox to the form. By default, Visual Basic assigns the name Textbox1 to the control.
- Then let’s add a Label, which Visual Basic automatically names Label1, to the form.
- Move and resize TextBox1 and Label1 to the approximate location shown in Figure 2.29.
- Add the first button to the form and place it in the lower-left corner. Visual Basic assigns it the name Button1.
- Add the second button to the lower-right corner. Visual Basic assigns it the name Button2.
It is important that you not get the buttons mixed up. You will need to know which button is which when it is time to begin adding code to the application. - Then add the third button to the upper-right corner of the form. Visual Basic assigns it the name Button3.
- Next, add a fourth button just beneath it. Visual Basic assigns it the name Button4.
- Finally, add a Timer control to your form, which Visual Basic names Timer1. Since the user doesn’t interact directly with the timer, the Timer1 control is displayed in the component tray rather than on the main form.
The layout and design of your Visual Basic form is now complete and should look like the example shown in Figure 2.29, except that the Timer1 control is displayed in a component tray just below the form.
Step 3: Customizing Form and Control Properties
Before you start customizing the properties associated with the controls that you just added to the form, let’s change one of the properties belonging to the form itself. Specifically, let’s modify the form so that it displays the text string of Click Race Game in its title bar. To do this, click anywhere on the form, except on top of one of its controls, and then locate the Text property in the Properties window and replace the default value of Form1 with Click Race Game.
The first control to modify is the Textbox1 control. Table 2.3 lists all of the properties that you should modify and shows what their new values should be.
| Property | Value |
|---|---|
| BackColor | Info |
| ForeColor | HotTrack (on the System Tab) |
| ReadOnly | True |
| Font | Arial |
| Font | Regular |
| Font | Size 14 |
| Size | 132, 29 |
Once you have completed making the property changes for the TextBox1 control, let’s work on the Label1 control by making the property changes shown in Table 2.4.
| | |
|---|---|
| Font | Arial |
| Font | Bold |
| Font | Size 12 |
| Text | Number of Clicks |
Now, referring to Table 2.5, modify the properties associated with Button1, Button2, Button3, and Button4.
| Button Name | Property | Value |
|---|---|---|
| Button1 | Text | Click Me! |
| Font | Arial | |
| Font | Regular | |
| Font | Size 9 | |
| Button2 | Text | Click Me! |
| Font | Arial | |
| Font | Regular | |
| Font | Size 9 | |
| Button3 | Text | Start Game |
| Font | Arial | |
| Font | Regular | |
| Font | Size 9 | |
| Button4 | Text | Exit |
| Font | Arial | |
| Font | Regular | |
| Font | Size 9 |
There is one last property modification that needs to be made. It is to the Timer1 control located in the component tray. By default, the Timer1 control’s Interval property is set to 100 by Visual Basic at design time. Interval represents the amount of time in milliseconds that passes during each interval measured by the Timer control. It is a lot easier for people to think in terms of seconds than in terms of milliseconds. So let’s change the value assigned to Interval1 to 1000 as shown in Table 2.6.
| Property | Value |
|---|---|
| Interval | 1000 |
That’s all the property modifications that are required for the Click Race game. Now it is time to give life to the application by adding the programming code that will make the game run.
Step 4: Adding a Little Programming Logic
Okay, it is time to start coding. If you double-click on Form1, Visual Basic starts things off for you by adding a number of lines of code, as shown next. Actually, what you’ll see in the code editor window is slightly different from what you see here. Take a look at the end of the second line of code shown below. Notice that it ends with the underscore character. In Visual Basic, the underscore character is used as a continuation character. I added it where I did so that I could make the code statement a little easier to read by breaking it out into two lines. Other than this cosmetic change, everything else is exactly the same.
Public Class Form1

    Private Sub Form1_Load(ByVal sender As System.Object, _
      ByVal e As System.EventArgs) Handles MyBase.Load

    End Sub

End Class
Visual Basic 2008 Express is an OOP (object-oriented programming) language. In order to work with an object, you must define an instance of the object in your application. In the case of the above code, in the first statement, Visual Basic defines an object named Form1 on your behalf, which extracts everything it needs from the Visual Basic Class Library. All code for the Form1 object or any of the controls that you have added to the form is placed somewhere after the Public Class Form1 statement and before the closing End Class statement. These two statements define the beginning and end of the code affecting the Form1 object.
In between the Public Class Form1 statement and the End Class statement are two more statements. These statements identify the beginning and end of the Form1_Load event procedure. Take a look at the first of these two statements and you will see that the first statement assigns the procedure the name Form1_Load. You can change the name of the procedure to anything that makes sense to you. The Load keyword refers to the form’s Load event. Events occur in Visual Basic whenever something happens. For example, when a form first appears or loads, the Load event for that form executes. Therefore, this procedure executes when the application starts (for example, when the form first loads). Don’t worry if this explanation is a little difficult to grasp just yet. I shared it with you now just to try to give you a feel for what Visual Basic is doing. I’ll go over procedures and events in much more detail in later chapters. |
Now it is time to begin adding code to the Click Race game. Again, since you won’t start learning how to formulate Visual Basic statements until Chapter 4, “Working with Menus and Toolbars,” just follow along and make sure that you enter any Visual Basic statements exactly as I’ll show you.
For starters, add the two statements shown below in bold exactly where shown. These statements define two variables that the application will use to keep track of how many times the player has clicked on the game’s buttons and how long the game has been running.
Public Class Form1

    Dim intCounter As Integer = 0
    Dim intTimerCount As Integer = 0

    Private Sub Form1_Load(ByVal sender As System.Object, _
      ByVal e As System.EventArgs) Handles MyBase.Load

    End Sub

End Class
Next, add the two statements shown below in bold in the Form1_Load procedure. These statements execute as soon as the form loads and gray out the two buttons used to play the game.
Public Class Form1

    Dim intCounter As Integer = 0
    Dim intTimerCount As Integer = 0

    Private Sub Form1_Load(ByVal sender As System.Object, _
      ByVal e As System.EventArgs) Handles MyBase.Load

        Button1.Enabled = False
        Button2.Enabled = False

    End Sub

End Class
Now click on the Form1.vb [Design] tab to return to the designer view and then double-click on Button1. This switches you right back to the code editor, where you will see that Visual Basic has added a new procedure named Button1_Click. Add the four statements shown below in bold to this procedure exactly as shown. The first statement adds a value of 1 to the intCounter variable, which the game uses to track the total number of mouse clicks made by the player. The second statement displays the value of intCounter in the Textbox1 control so that the player will know that a click has been counted. The next two statements gray out or disable Button1 and enable Button2 (because the game forces the player to alternate the clicking of these two buttons).
Private Sub Button1_Click(ByVal sender As System.Object, _
  ByVal e As System.EventArgs) Handles Button1.Click

    intCounter = intCounter + 1
    TextBox1.Text = intCounter
    Button1.Enabled = False
    Button2.Enabled = True

End Sub
Now click on the Form1.vb [Design] tab to return to the designer view and then double-click on Button2. This switches you back to the code editor. You’ll notice that Visual Basic has added a new procedure named Button2_Click. Add the four statements shown below in bold to this procedure. As you can see, these statements look almost exactly like the four statements that you added to the previous procedure, except that the last two statements switch the enabling and disabling of the two game buttons.
 Private Sub Button2_Click(ByVal sender As System.Object, _
  ByVal e As System.EventArgs) Handles Button2.Click

    intCounter = intCounter + 1
    TextBox1.Text = intCounter
    Button1.Enabled = True
    Button2.Enabled = False

End Sub
Now it is time to add some code to the game’s Start button (Button3). Start by clicking on the Form1.vb [Design] tab to return to the designer view and then double-click on Button3. This switches you back to the code editor. You’ll notice that Visual Basic has added a new procedure named Button3_Click. Add the six statements exactly as shown below to this procedure. This procedure is used to start or restart the game at any time. The first two statements reset the values assigned to the game’s two variables back to zero. The next statement clears out Textbox1. Two statements that follow enable Button1 and disable Button2. The last statement restarts the Timer1 control.
Private Sub Button3_Click(ByVal sender As System.Object, _
  ByVal e As System.EventArgs) Handles Button3.Click

    intCounter = 0
    intTimerCount = 0
    TextBox1.Text = ""
    Button1.Enabled = True
    Button2.Enabled = False
    Timer1.Enabled = True

End Sub
Now let’s fix up the Exit button (Button4) so that it will close the Click Race game when the player clicks on it. Click on the Form1.vb [Design] tab to return to the designer view and then double-click on Button3. This switches you back to the code editor, where you’ll see that Visual Basic has added a new procedure named Button4_Click. Add the following statement to it, shown in bold, exactly as shown next. This statement tells Visual Basic to exit the application.
Private Sub Button4_Click(ByVal sender As System.Object, _
  ByVal e As System.EventArgs) Handles Button4.Click

    Application.Exit

End Sub
Now all that is left to do is to add some code to the Timer1 control so that it will limit the player’s turn to 30 seconds. Click on the Form1.vb [Design] tab to return to the designer view. Double-click on Timer1. Visual Basic automatically adds the Timer1_Tick procedure to your application. Add the five Visual Basic statements shown below in bold to this procedure. The first statement tells the Timer1 control to keep track of the number of seconds that it has run. Remember that you previously configured the Timer1 object’s Interval property so that the Timer1 control would execute every second. The next four statements will execute as soon as the Timer1 control has run for 30 seconds, at which time the two game buttons will be disabled, thus ending the player’s turn.
